Astronomer's Observing
Chair:
My Version of the
Denver Chair
After owning my telescope for a couple of days and spending a few hours bent over it in the cold, I realized I needed a seat. I tried a folding lawn chair, but that did not work. My telescope is a Newtonian reflector with a Dobsonian mount and the eyepiece -- the part through which you look -- can be close to the ground or several feet off the ground, depending on the location of the object you are viewing.
I searched several astronomy sites and found "observing chairs" for sale -- starting at over $100.00 and going up -- some of them were far up. Then, I found plans for the "Denver Chair" -- an observing chair with an adjustable height seat that can be built in a few hours for a few dollars.
I will not go into the details of materials and instructions. This link has a bill of materials and step-by-step instructions for building a Denver Chair: The Denver Observer's Seat
The materials can all be found at a well-stocked lumber and building materials store -- I went to my local Lowe's (Home Depot would work, too) and picked up all materials for just over $20.00. I started work around 10:00 Sunday morning and was sitting in the chair Monday night -- and most of that time was the hours spent waiting for two coats of paint to dry.
Go to the link above and print the bill of materials and instructions. Here are some tips from my experience:
- You need ONE 8-foot-long 2 x 4 -- get a good one, straight, tight grain, few knots, not stud grade, and make certain it is a full 8 feet long.
- The bill of materials says you need plywood scraps for the seat and seat supports.
Some places sell pre-cut plywood pieces. I bought a 24 x 24-inch piece of
3/4-inch cabinet grade plywood. You can get all the pieces you need from this one
piece with scrap left over.
Here are photos of my chair. By the time I took these photos, I had cut everything to size, applied two coats of exterior semi-gloss paint, and assembled the seat.
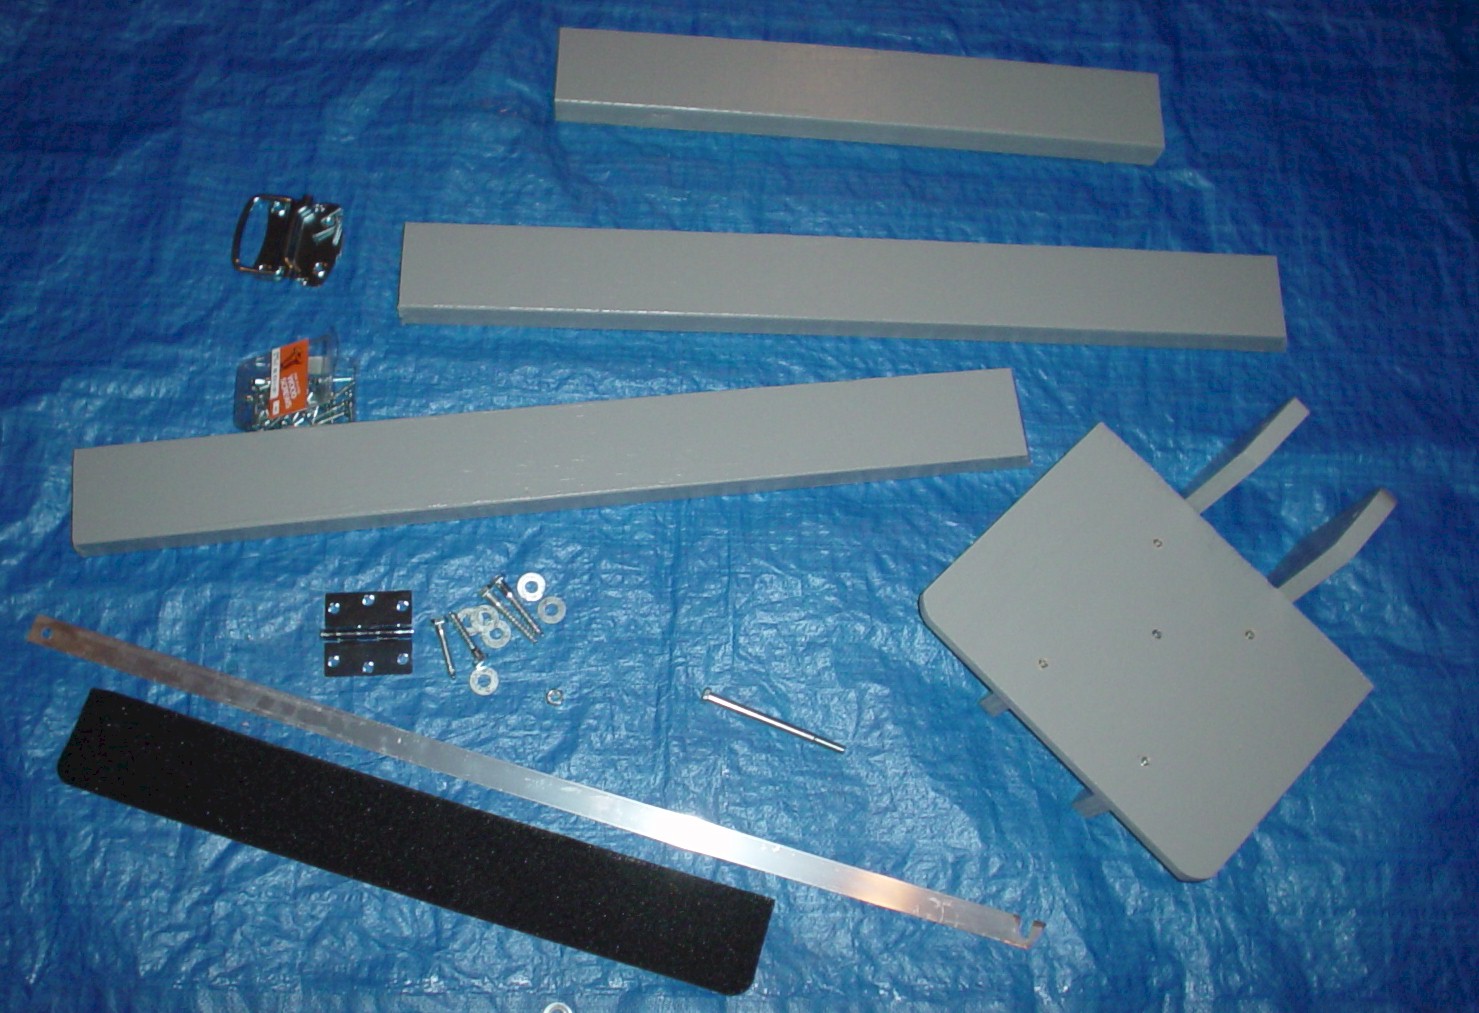
The parts are, top to bottom:
- The cross-piece that forms the front foot of the chair
- The two legs that will be hinged together
- The metal strip is the spreader that raises or lowers when the chair is set up.
- In the right bottom corner is the seat, already assembled.
- The black strip is the safety tread that is used to hold the seat in place. (NOTE: Forget about this. I installed this per the instructions; it tore the first time I used it, tore when I replaced it, so I pulled it off and don't use it.)
- Metal parts are: chest handle, wood screws, hinge, lag screws and washers, hex
bolt.
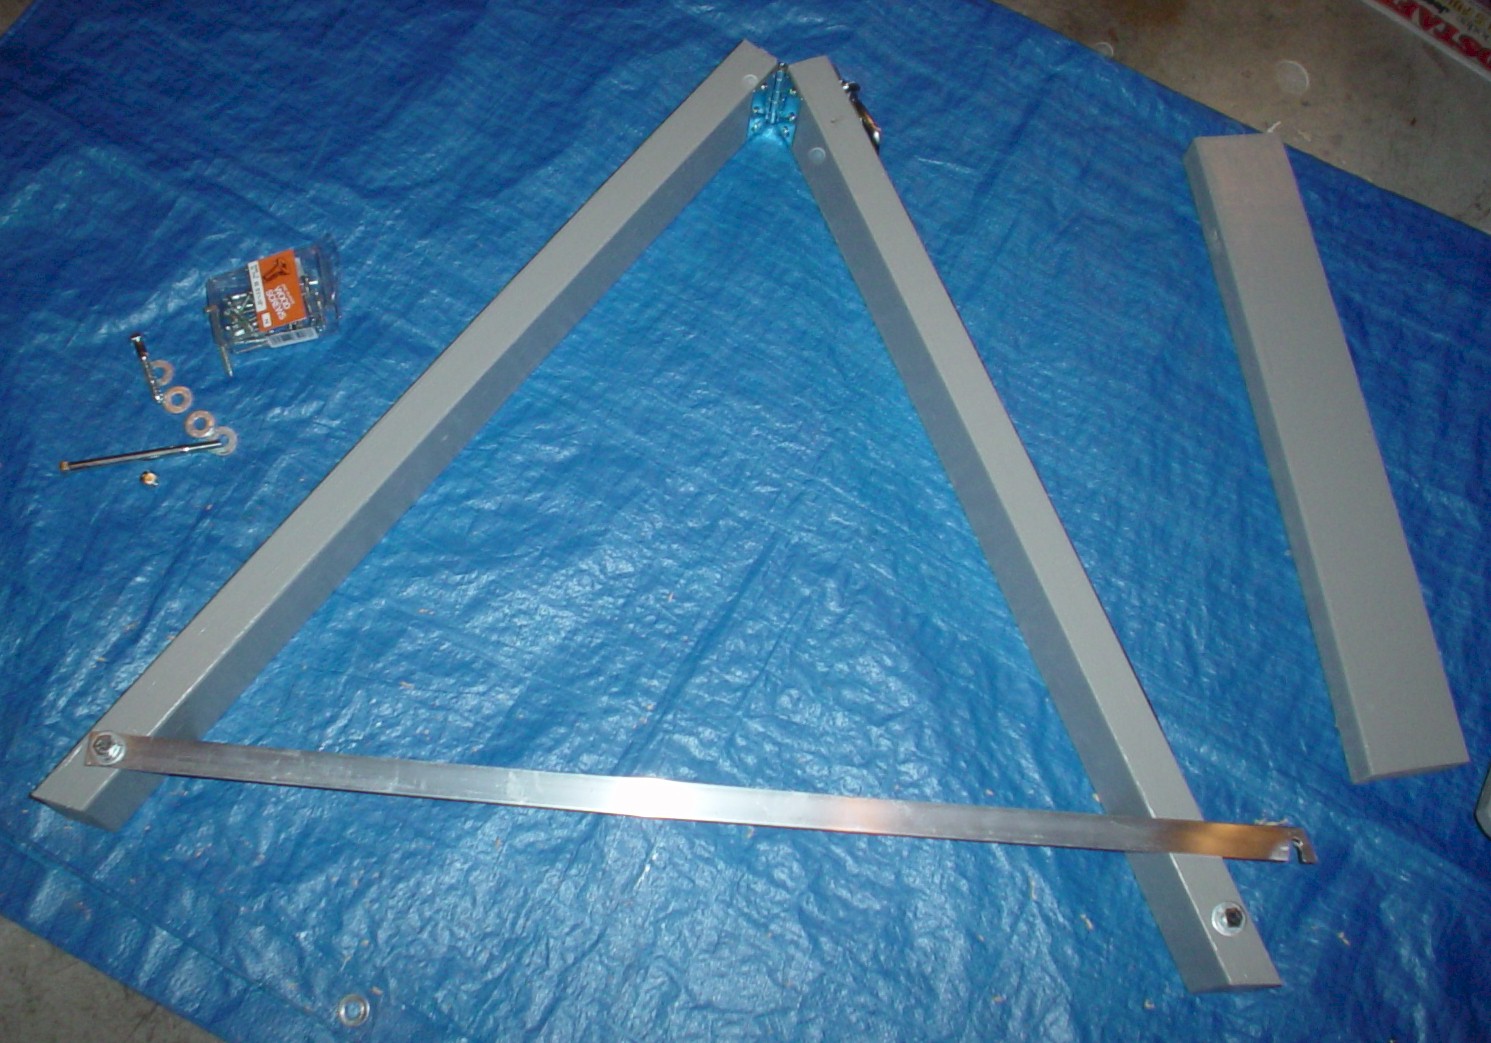
Legs assembled, with aluminum spreader
Here are the two legs assembled. Note that the bottoms of the legs are cut with a 22-1/2-degree bevel (per the instructions). Legs are joined at the top with the hinge. The aluminum spreader bar is lag screwed at its left end, the right end has a notch that drops down over another lag screw to hold the legs apart at the proper angle. At the top of the legs, where they join, you see a shiny metal piece barely visible on the outside top of the right leg -- that's the chest handle in place. The third board is the foot -- you will see where it goes,
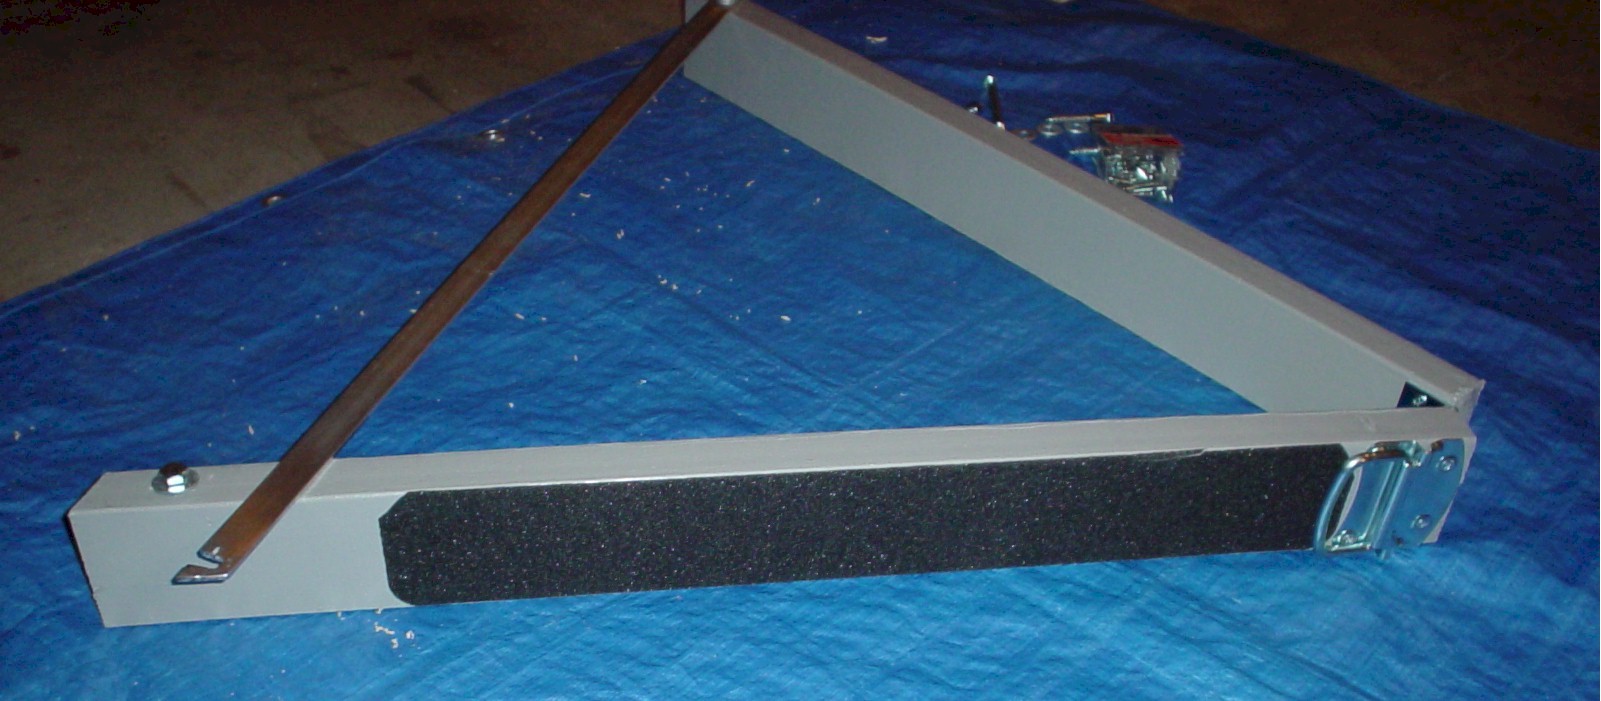
The front leg
This close-up view shows the front leg. Note:
- The chest handle for carrying the seat. WARNING: Pay attention when installing this handle. It will lie flat in only one direction -- be certain to install it so it lies flat folded down -- you'll see what I mean.
- The black strip is a 24x6 inch stair safety tread cut to width to fit the front of the 2x4. It has an adhesive back that adheres it to the 2x4. (NOTE: Forget about this. I installed this per the instructions; it tore the first time I used it, tore when I replaced it, so I pulled it off and don't use it.)
- This view shows the notched end of the aluminum spreader. Note that the notched
end of the aluminum spreader is cut on an angle to match the angle of the legs when the
chair is open. Lowe's sells aluminum stock -- this piece was 1 inch wide, 1/8 inch
thick, 36 inches long. Read the directions -- use a hacksaw to cut it to length per
the instructions, drill a 3/8-inch hole in each end (see instructions for location of the
hole) then use the hacksaw to cut into the hole on one end, making the notch.

The completed chair
This is not a very good shot -- I did not realize the bathroom scale was in the photo (at the top of the chair) -- it's not part of the chair. Study this photo and the instructions -- you'll see how it goes together and how it works. Note:
- Where the seat abuts the black safety strip on the front leg is a piece of 3/4-inch automobile heater hose -- rubber hose, split lengthwise, slipped over the seat, and tacked in place. When you sit on the seat, the hex bolt through the top rear of the seat support (see the shiny silver nut at the top of the seat support) forms a fulcrum and the rubber hose presses down onto the gritty safety strip -- the seat is held in place by the fulcrum and the friction between the rubber and the safety strip. It will not move -- believe me.
- The foot across the front leg keeps the seat from tipping over side-to-side.
- The metal brace keeps the legs from spreading or folding when the chair is in use.
- WARNING: When you build your chair, be very careful when you
install the lag screw for the open end of the aluminum spreader. Look at this photo
-- look at the bottom of the front leg -- notice that the horizontal foot is attached to
the front leg and the front-to-back aluminum spreader slides onto the lag screw in the
front leg just behind the foot. When you put that lag screw in place, place it 2
inches from the bottom of the leg and set it slightly behind the center of the edge of the
front leg so there is plenty of room for it to swing into place.
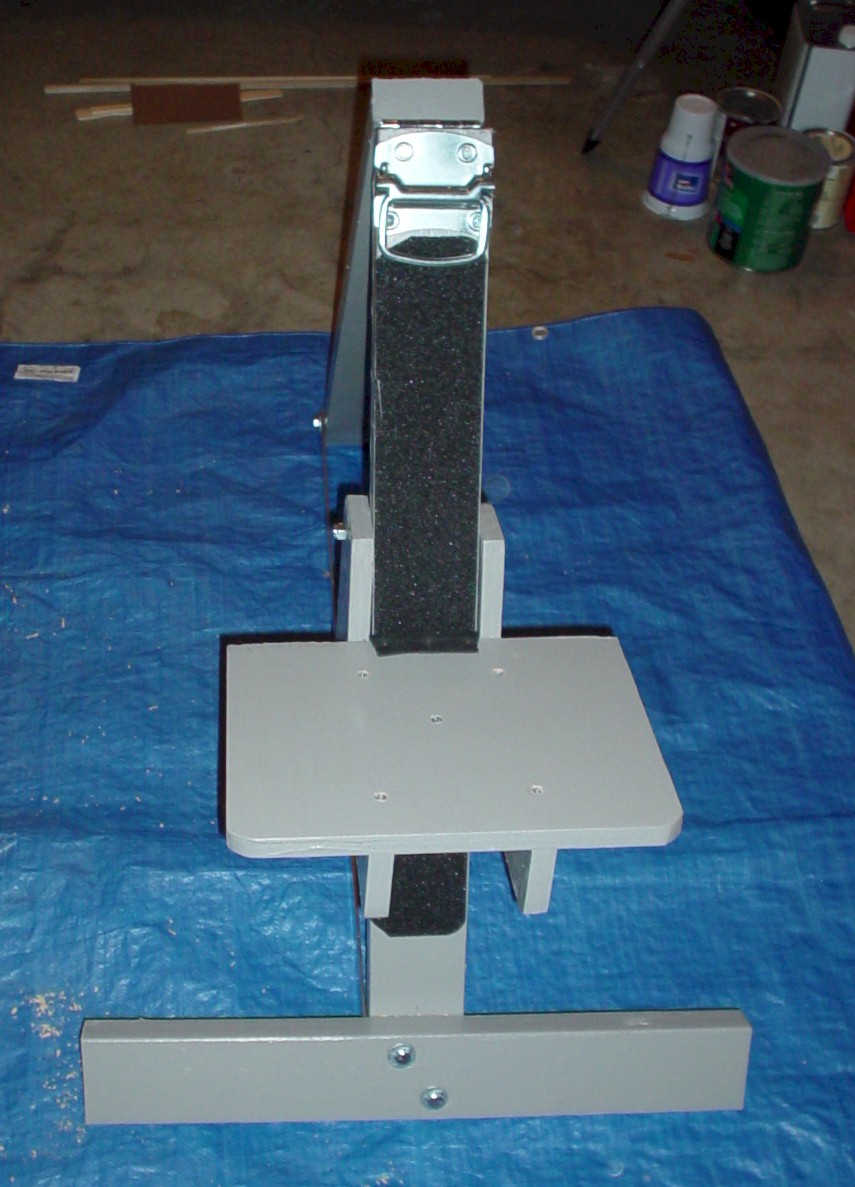
Front view
Here is a front view that shows the seat more clearly.
Sorry, I did not take any photos of the chair folded. Here are a couple of links showing other Denver Chairs built by other people.
- Here is another good job -- Don's Denver Chair
- This page has photos of members of the Shenandoah Valley Stargazers with their Denver Chairs in use
You can make variations on the chair.
- On my chair, the horizontal foot across the front leg is lag screwed into the front leg. Some guys bolt the foot on using bolts and wing nuts so they can remove it for carrying. I don't like the idea of keeping up with loose bolts and wing nuts.
- I painted mine -- you can use any good outdoor finish -- marine varnish, polyurethane, paint.
- You may want to add a horizontal foot across the rear leg -- this would require another piece of 2x4 because the chair will use every inch of one 8-foot 2x4.
And there you have it -- $20.00 to $30.00 and you have a fine observing seat.