Preparing for the slab
This house will be built on a concrete slab. We wanted to raise the house 18 - 24 inches above the natural grade for a couple of reasons: (1) It looks better with the house elevated rather than having is sitting flat on the ground, and, (2) with the lot at 15.1 feet above MSL, if we added another 2 feet, we would be at 17 feet which should put us above the flood surge from all but the worst hurricane.
To elevate the house, we had to haul in over 300 cubic yards of fill. In this area, to fill under a slab, the excavator first scrapes the topsoil into a pile at the back of the lot. Then he puts down 2 feet of sand followed by 2 feet of red clay. The sand provides a sump to direct water away from the clay and the slab. As the excavator spreads the sand and clay, the weight of his bulldozer packs the fill into a very dense mass. After the fill is spread, we waited for a week -- the action of rain and sun on the clay baked it as hard as concrete.
Now we are ready to prepare the fill pad for pouring the slab. The process is this:
- Using a transit, we shot the grades. That is, we erected the transit and used it to place stakes around the fill, showing the excavator where to take off fill to level the pad.
- The excavator then used a small grader -- a Bobcat with a dozer blade -- to cut off the top of the fill level.
- Using the transit, plumb bob, and 100-foot tape measure, we laid out batter boards to mark the corners of the house. After erecting the batter boards, we checked and re-checked our measurements to ensure the house is the correct size and is square.
- The slab is held into the ground with footers. To build a footer: first, dig a trench 2 feet 6 inches deep, 18 inches wide. Set steel reinforcing rods (rebar; 1/2 inch diameter, 20 feet long) on wire seats in the trench.
- However, the plumbing for the house goes into the dirt under the slab. So, as soon as the footers are dug (and before setting the rebar), the plumber comes in and digs trenches in which he lays the waste water pipes (3- and 4-inch PVC) and the supply lines (3/4-inch schedule K copper tube). Copper tubing is used so there are no solder joints below the slab.
- After the plumbing is in, the dirt is treated with a termite treatment to kill termites and their eggs in the soil.
- Cover the entire area under the slab with polyethylene sheet -- 6 mi thick black plastic.
- On top of the sheet, the electrician places conduit to run any wiring that will be in the slab.
- Concrete bricks are laid on the plastic, 48 inches apart front to back and side to side.
- Rebar is then laid in the footers.
- 6X6 welded wire mesh (66WWM) -- which comes in rolls 5 feet by 100 feet -- is then rolled out to cover the entire area.
- Concrete is then poured over the whole affair.
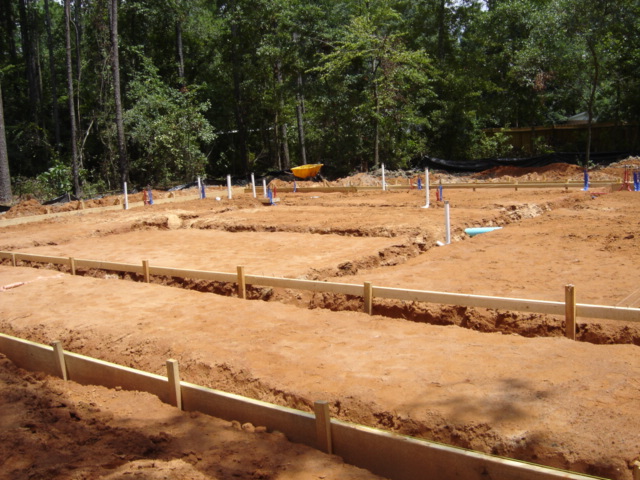
Here are photos.
In this picture, you see: (1) the wooden forms that will contain the wet cement as it is poured to make the slab. (2) The footers -- these are the long trenches running front to back and side to side. (3) The plumbing. The waste pipes are the white PVC pipes sticking up here and there and the supply lines are the red and blue pipes sticking up. The supply lines are schedule K copper tubing, 3/4-inch diameter, with red or blue vinyl sleeving pulled over the copper tube to keep the copper out of contact with the dirt and the concrete. The large light-blue-green pipe partially visible just to the right of center is the main waste water line -- it runs from the right side of the house to the left side and all the smaller waste lines feed into it. This line then runs to the sewer connection at the street.
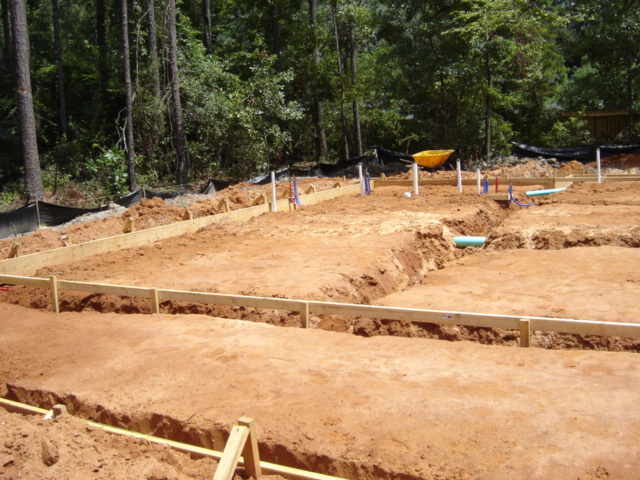
Left side of the house. The white drain pipe and the red and blue copper pipes in the center left, against the form, are the supply and drain lines for the sink in the master bathroom. The small, round white piece of PVC just barely sticking above the ground (in front of the yellow wheelbarrow) is the flange for the toilet in the master bath.
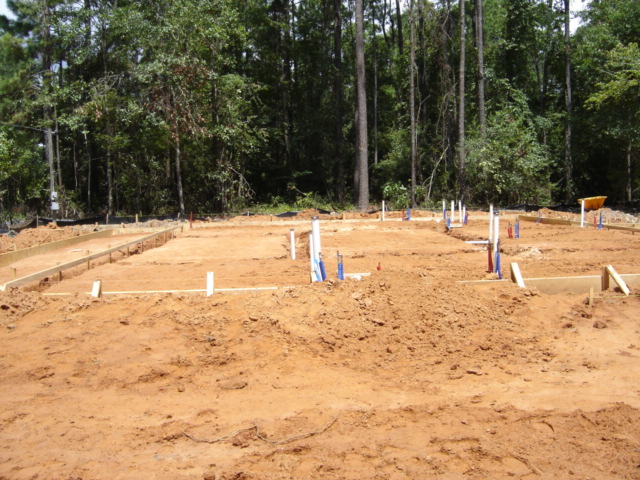
This photo is taken standing in front of where the carport will be, looking across where the house will be. All plumbing is in place. We are now ready for the termite treatment, lay the plastic, set rebar, lay wire, and pour concrete.
Back to house-building main page.