New House:
HVAC, Plumbing
and
Electrical
Rough-in
After the roof is on the house is said to be dried in -- now it's time for rough-in -- this is when the heating system, plumbing, and electrical installation is done. However, only the rough part of the installation is completed in this stage -- installation of finished materials such as faucets, showers, switches, cover plates on outlets, and the like, will be done in the final heating, plumbing, and electrical installation. ( NOTE: I will use the term HVAC to refer to the Heating, Ventilation, and Air Conditioning system. )
For the rough-in, we met the HVAC installer, plumber, and electrician at the house -- each on separate days. We walked through the house pointing out where we wanted heat/AC vents, thermostat, shower, faucets, tubs, electrical outlets, overhead lights, switches, etc., etc., etc. Then the fun began.
HVAC
I don't have any photos of this work. We are installing a 5-ton, 16-SEER York heat pump with propane furnace backup. The heat pump both heats and cools, however, heat pumps become very inefficient when the outside temperature reaches around 40 degrees. Our heat pump includes a gas furnace that burns propane and that kicks in when the outside temperature reaches 40 degrees. We will bury a 250-gallon propane tank in the back yard to supply propane to the furnace, the gas cooktop, and the fireplace.
The HVAC crew hauled the furnace and the air mover ( blower and filter unit ) under the house into the crawl space. Then they ran rigid metal duct under the house to each floor outlet and connected it all together.
Plumbing
The plumber installed all supply lines, drain lines, and vent pipes. We now are waiting on the plumbing inspector to run a stack test and a pressure test. In the stack test, the drain lines are plugged and the vent pipe is filled with water. The inspector then checks to see that water does not run out of the plugged drains -- which indicates that there are no leaks in the drains. In the pressure test, all water supply lines are plugged and the system is pumped full of air. The inspector then inserts a pressure gauge onto a supply line and watches to see if the air pressure drops -- if the pressure remains steady, there are no leaks in the system.
Here is a photo of a plumbing rough-in.
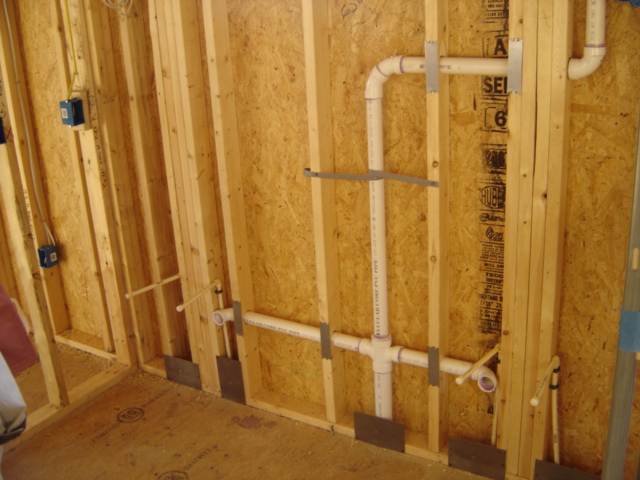
This photo is the dressing area that will have a double vanity with two sinks. The big white pipes are drain lines -- note that there are two of them sticking out horizontally -- these are underneath where the sinks will be. In the final installation, we will install a vanity, put on a countertop, install two sinks, and run drain lines from the sinks to these two rough-in connections. Notice the small white pipes sticking out from the wall. These are the supply lines -- one each hot and cold for each sink. The big white pipe running vertically then horizontally and then vertically is the vent pipe -- drains will not work without air pressure, so, a vent pipe runs from each drain up into the attic where they are tied together and one vent pipe runs through the roof, thereby admitting air pressure to make the drain work and venting sewer gasses outside the house. The gray strap around the vent pipe holds it in place. The gray pieces along the wall in front of each piece of pipe are pieces of galvanized steel -- these are shields to prevent someone from driving a nail through the wall and into a pipe.
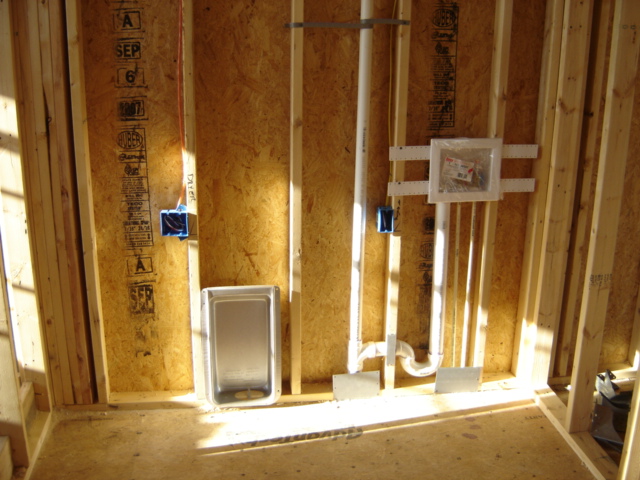
This photo shows electrical and plumbing rough-in for the washer and dryer. The blue boxes contain the wiring for the dryer ( left ) and washer ( right ). Water supply lines and drain line for the washer are on the right -- note the vent pipe for the washer drain running vertically up the center of the photo. The silver object sitting on the floor where the dryer will go is the box that will contain the dryer vent connection.
This photo shows the drain rough-in for the shower in the master bathroom.

All this wood will be covered with cement board ( variously called Durock or HardiBacker ). The cement board will be covered with ceramic tile to make the shower. The white object in the center of the photo is the shower drain. The red stuff is waterproof membrane. The plumber will install the membrane on the floor of the shower and up the walls for a few inches. He will then put mortar on the shower floor and will slope the mortar so it runs toward the drain. This way, when the tiles are installed, water will run over the tile floor down the drain. The triangular area is a seat inside the shower.
| Return to new house first page |
| Go to next page for more rough-in work |