Newtonian Collimation --
Page Three
You should have come here from Page Two -- if not, go back and start over.
Adjusting the secondary mirror (cont.)
Paper in place and now you see only the secondary mirror and its mount when you look through the focuser opening. Now, insert the sight tube -- the long collimating tube with the crosshairs. Look through the sight tube, push it into and pull it out of the focuser opening -- as you do this, look at the circle formed by the end of the sight tube, the secondary mirror, and the relationship between them. Note that as the sight tube goes into the focuser, it gets closer to the secondary and the space you see between the edge of the sight tube and the edge of the secondary gets smaller and smaller. You want the round image of the secondary to almost fill the end of the sight tube -- but the sight tube should be out far enough so you see a circle of colored paper around the secondary.
Now, look at this picture -- perform these adjustments in this order.
CAUTION: My photos show the telescope tube sitting vertically while I am adjusting the secondary mirror. DO NOT DO THIS -- move the scope tube to its horizontal or near-horizontal position. Because -- if you drop the screwdriver or the hex wrenches while the tube is vertical, the tool(s) will fall onto the mirror and likely will damage the mirror, rendering the telescope useless.
- Move the secondary mount into and out of the tube with the Phillip's head screw until the secondary mirror is centered top to bottom.
- Use the Allen screws to make the secondary a perfect circle, centered in the sight tube.
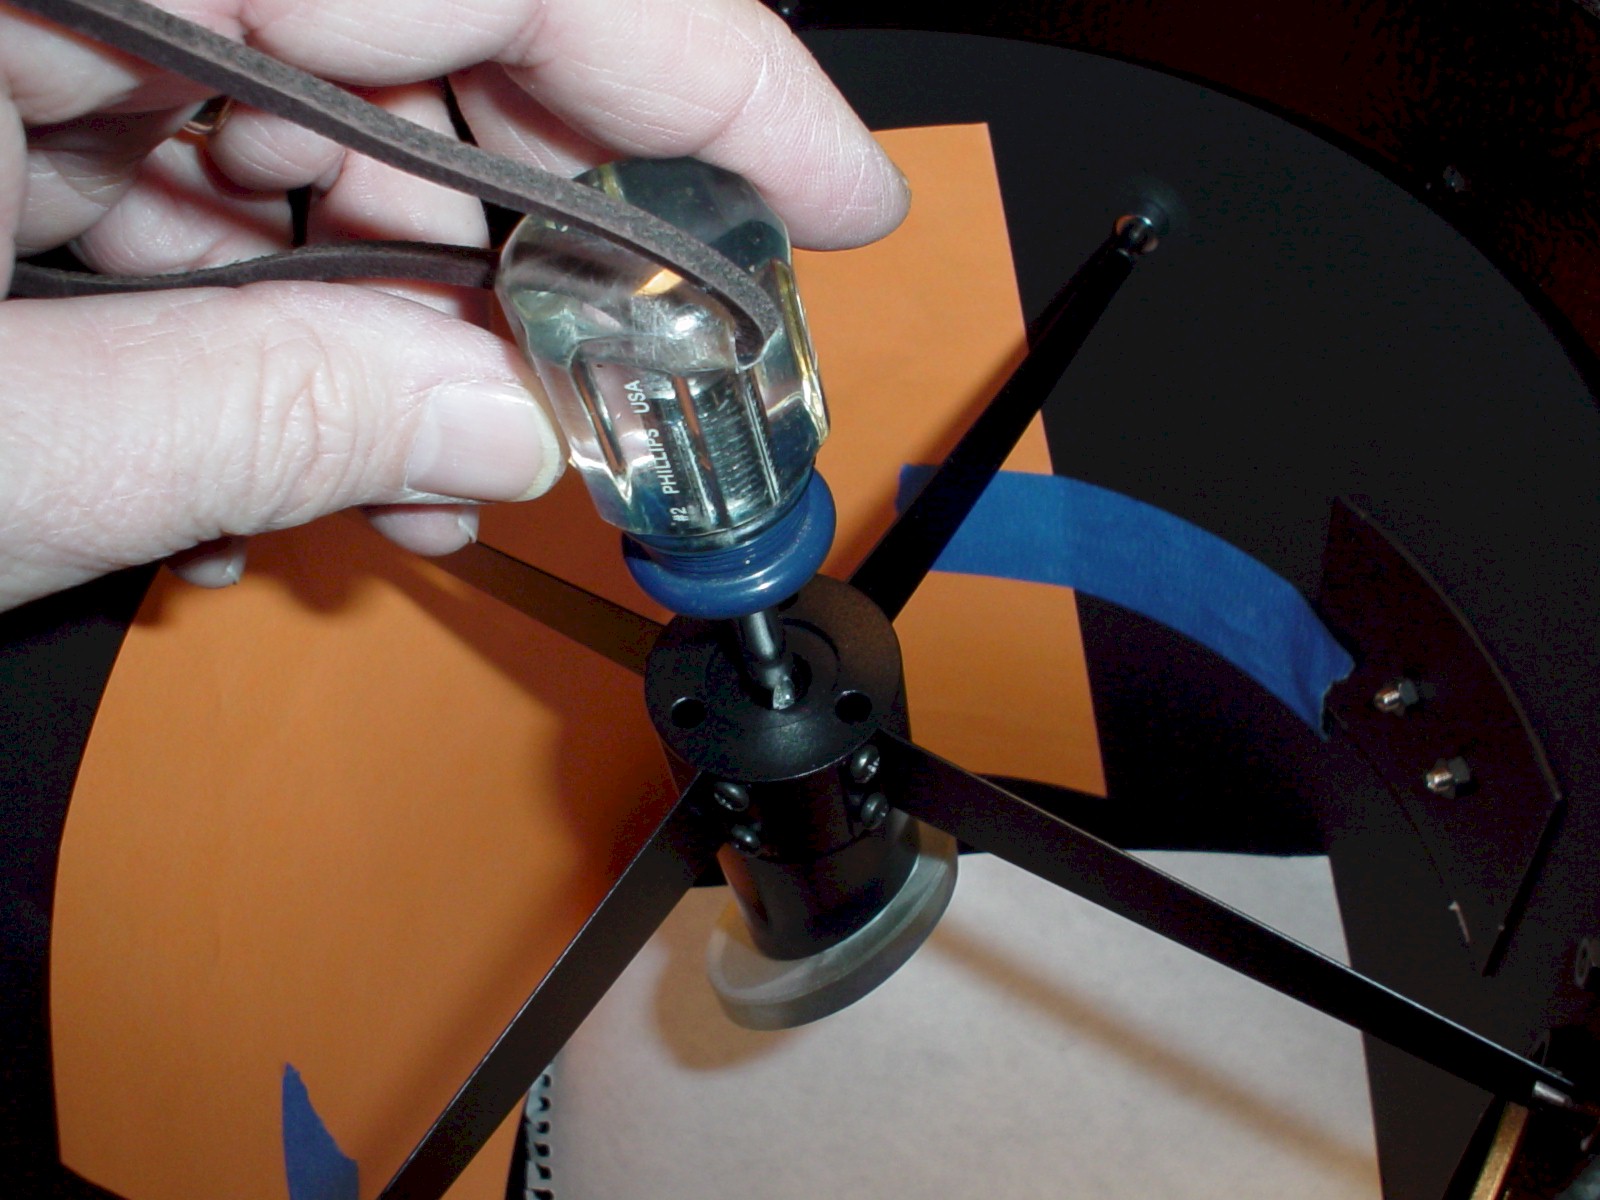

In the left-hand photo the Phillip's head screwdriver is inserted into the central screw. Note the leather thong -- that's my own invention -- drill a hole in the handle; thread a thong, shoelace, or piece of string through the hole; tie a loop in the thong to go around your wrist. This way, if you drop the screwdriver, the thong catches it and it does not plunge down the tube and destroy your primary mirror. The right-hand photo shows three 2mm Allen head wrenches -- you really need only one but I put three in for illustration. The mirror's tilt is adjusted by the three Allen head screws into which these wrenches are inserted.
To center the secondary mirror:
Centering it top-to-bottom
- Loosen all three Allen screws 2-3 turns each.
- Stick your hand down the tube and grasp the mount just behind the secondary mirror -- do not get your fingers onto the polished edge of the mirror.
- Holding onto the mirror, bend over and look through the sight tube.
- Tilt the mirror from side to side and see how it moves from being a circle to being a distorted circle. Move it around a bit to see what it looks like then move it to where it is a circle -- don't worry if it's not perfect.
- Get you hand out of the tube.
- Now, look carefully and critically at the secondary mirror -- look only at it's position up and down in the tube. The secondary should be centered top-to-bottom in the sight tube. It likely is not.
- Take your eye off the eyepiece. Reach one hand down the tube and grasp the mount so the mirror will not turn side to side. While holding the mirror, with your other hand, screw the Phillip's head screw in or out.
- Get your hands out of the tube, look through the eyepiece -- note that the secondary has moved UP toward the open end of the tube, or, DOWN toward the primary -- depending on how you turned the central screw -- CW or CCW. It's probably still not centered top-to-bottom -- BUT -- now you know what happens when you turn the central screw. Do you need to move the mirror UP or DOWN?
- Get away from the eyepiece, stick one hand down the tube to grasp the mirror, insert the screwdriver, and turn it CW or CCW to move the mirror DOWN or UP as you determined.
- Look through the eyepiece -- keep this process going until you have the secondary mirror centered top-to-bottom in the eyepiece -- the crosshairs help.
Centering it side-to-side and making the mirror round
Now, the secondary mount is moved so the mirror is centered top-to-bottom underneath the focuser opening. We need to make the mirror appear to be perfectly round and we need to center it side to side.
- Reach down the tube, grasp the mirror just where it meets the mount, look through the eyepiece, and move it slightly. See what happens -- moves side to side, out of center and probably out of round. With your hand set the mirror to where it is centered on the crosshairs and where it appears perfectly round.
- Using the Allen wrench, gently tighten the Allen screws. STOP turning each screw when you feel it touch the mirror mount.
- Look through the eyepiece -- you probably turned one screw in too far and the mirror is not quite centered and round.
- Fiddle with the Allen screws -- loosen one very slightly, then, while looking through the eyepiece, tighten another one slightly and watch what happens to the mirror -- you will see it move. Do this with the screws until you get the idea of which screw does what.
- You will go back and forth and back and forth but eventually you will see this through the sight tube (pardon my poor sketching)
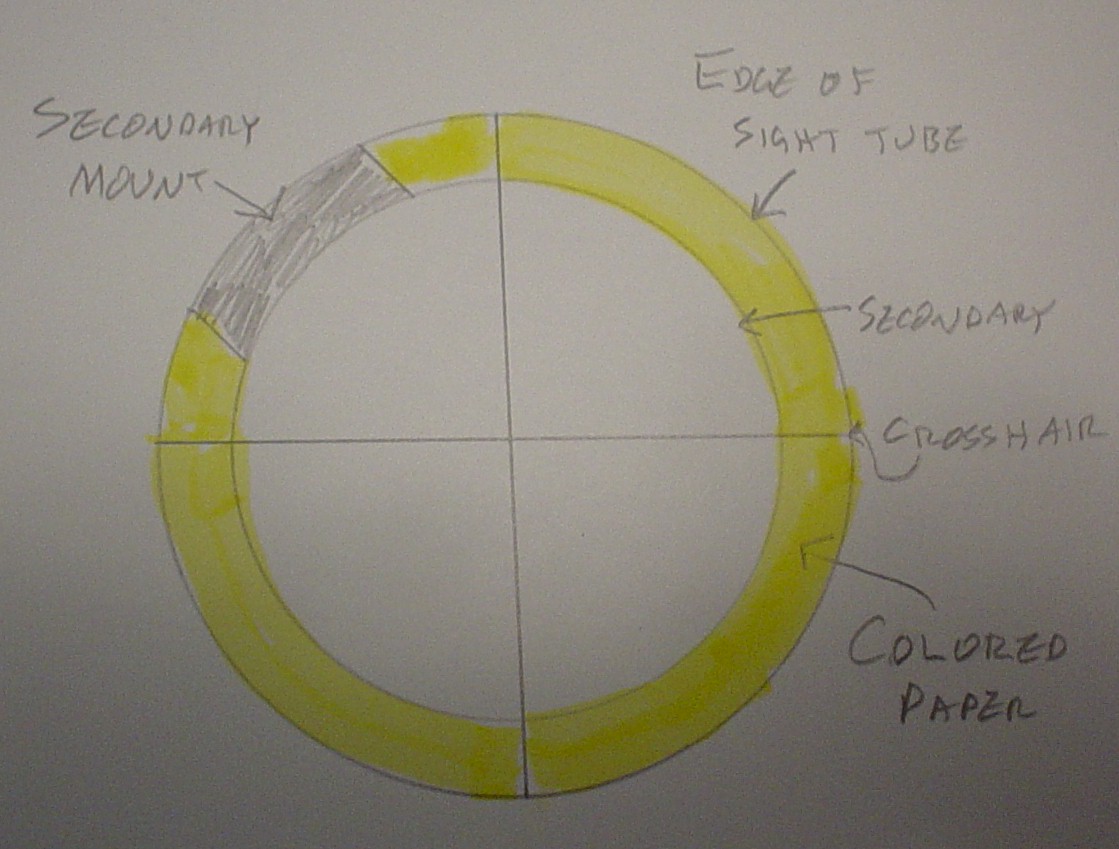
You will see a black outer circle -- that's the edge of the sight tube bottom. You will see the secondary mirror appearing as a perfect circle inside the sight tube and concentric with the sight tube. Note that the space between the sight tube and the mirror is filled with color from the paper -- the color is easy to see and the combination of concentric circles, the crosshairs, and the colored band will allow your eye to easily see when the secondary mirror is perfectly centered top-to-bottom, side-to-side, and is tilted to where it appears as a perfect circle.
When you are at this condition, with the secondary centered and round, tighten the Allen screws and double-check. You may need to make minor adjustments. Now, read this: After adjusting the secondary, you will not need to adjust it again -- just check it maybe once a year, or, if the scope has been seriously banged around. Once the secondary is set, it's set unless someone really tries to screw it up -- and adjusting the secondary is the longest operation.
The first time you do this, you will be frustrated. Don't' be afraid to make bold changes, don't be afraid to walk away and come back later -- nothing you do is irreversible -- just turn the screw in the other direction. Further, READING ABOUT IT IS MUCH MORE DIFFICULT THAN DOING IT. I collimated my scope three times before I got it right -- the third time, the whole process took ten minutes.
Adjusting the primary
Congratulate yourself -- your secondary is adjusted and you will not need to do it again for a long time. Adjusting the primary is easy.
Remove the piece of paper that's blocking the tube -- the white paper in my photo -- do not remove the colored paper inside the tube opposite the focuser.
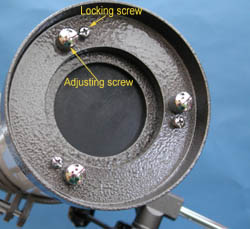
Check your owner's manual for collimation instructions -- look for the place where it describes the screws that hold the primary mirror. Tilt the scope at a 45-degree angle or so and bend over so you are looking at the outside bottom of the tube. You will see six knurled knobs of some kind in three pairs of two. In each pair, one is a locknut, one is an adjuster. Read your owner's manual to determine which is which. Loosen the locknuts a couple of turns. This is a photo of the bottom of one scope -- yours will be similar.
Remove the sight tube and insert the collimating eyepiece (auto-collimator). Look through the eyepiece and you will see something like this:
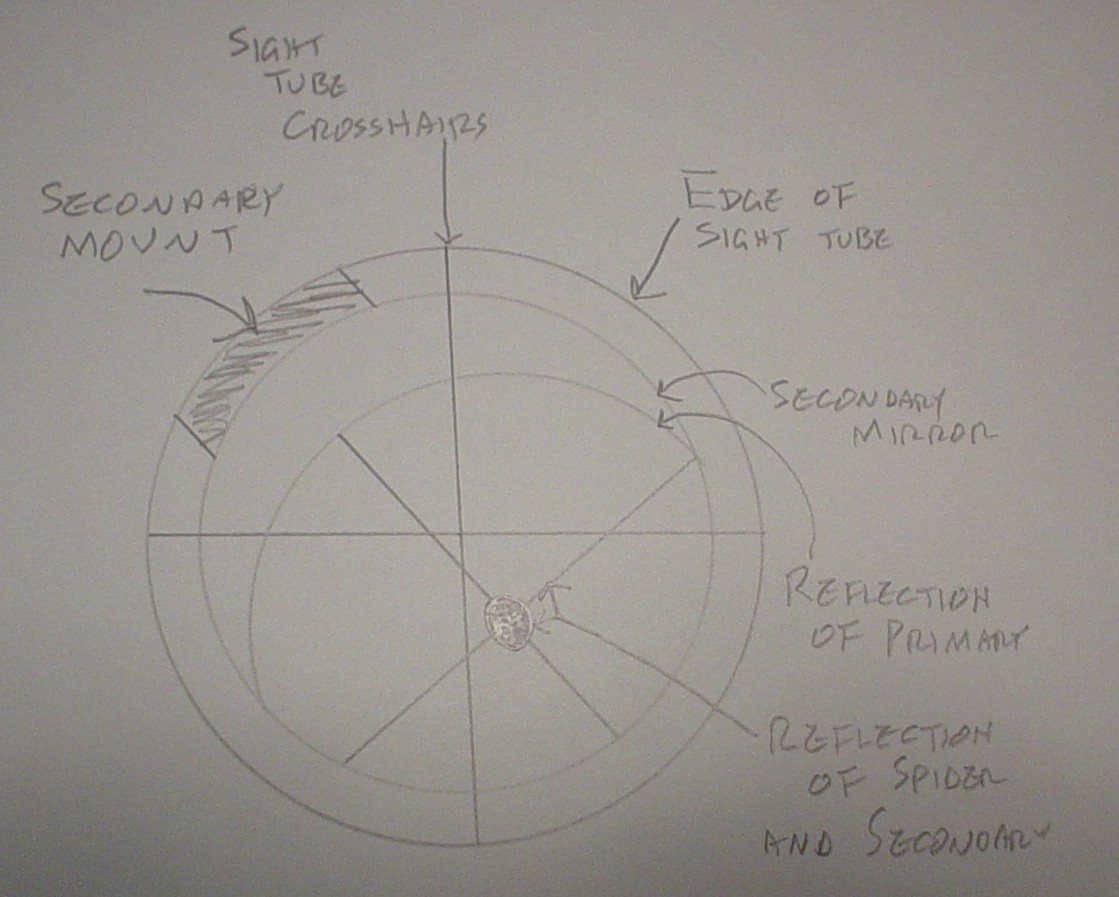
You will see your secondary mirror nice and centered. In the secondary mirror you will see the REFLECTION of the primary mirror. In the reflection of the primary mirror you will see the reflection of the spider and the secondary. Somewhere on the primary mirror you will see its center spot or center circle. If your collimating eyepiece has crosshairs, or if you are still looking through the sight tube, you will see crosshairs.
Look at the reflected edges of the primary mirror -- you will likely see only part of the edge as its reflection is not yet centered in the secondary. The primary is held onto its mount by three clips; these will appear as three black rectangles on the edge of the primary, spaced evenly around the edge. Because your primary is not yet centered, you will likely see only two of these clips.
You already loosened the locknuts at the bottom of the tube. Now, turn one of the adjusting screws half a turn; look through the eyepiece and see what you did -- you moved the reflection of the primary.
You want to alternate between looking through the eyepiece and turning adjusting screws. You will see a circle that is the bottom of the sight tube or the collimating eyepiece. You will see a band of color -- that's your paper. You will see a circle that is your old friend the secondary mirror. What you want to do is move the primary mirror with the adjusting screws until its REFLECTION IN THE SECONDARY is dead centered on the secondary. You can tell when it's centered because:
- The primary mirror is round and it will form a third concentric circle -- looking from
the outside, you will see:
- a black circle that is the edge of the eyepiece or sight tube
- a circle of color -- your paper
- the circle that is the secondary
- a circle inside the secondary that is the primary
- You will see all three clips -- they provide a guide to tell when the primary is centered
- You will see two circles in the center of the primary:
- You are looking through a tiny hole in the center of the eyepiece -- that hole is reflected in the primary mirror and you can see it -- if you look closely, you can see your own eyeball
- The primary mirror has a center spot or circle -- it is dead center in the reflection of the eyepiece hole; if you have cross hairs, it's centered under the crosshairs.
Tighten the locknuts. Go back to the eyepiece and look at everything CAREFULLY AND CRITICALLY:
- Secondary dead center in the eyepiece.
- Secondary is a perfect circle, concentric with the bottom of the eyepiece.
- Reflection of the primary is centered in the secondary.
- Center spot on the primary is centered.
When you tighten the locknuts, you may move the primary -- just readjust the adjusting nuts slightly.
Your scope is collimated. Go forth and view.
But wait -- what about the Cheshire eyepiece?
Good question. The Cheshire is used to adjust the primary mirror. Remember I told you that the secondary, once adjusted, normally does not need adjusting unless the scope takes a serious hit. The primary mirror is another story. Here are some reasons that the primary needs collimation from time to time.
- Wide temperature changes. Suppose you collimated your scope in the dead of winter, in the garage, with ambient temperature below zero. Summer arrives and the outside temp is 85 degrees at night. The primary may need collimating -- not the secondary.
- Scope takes a rough ride. You haul the scope out to a distant dark site and it gets bumped around in transit.
Now, you are outside, it's dark, your eyes are dark-adapted, and you don't know if the scope is collimated properly. You know your secondary is in good shape because you adjusted it properly and it rarely needs further adjustment. You don't want to turn on a white light and fool around with the primary adjusting screws. This is where the Cheshire comes in.
Look at the Cheshire.
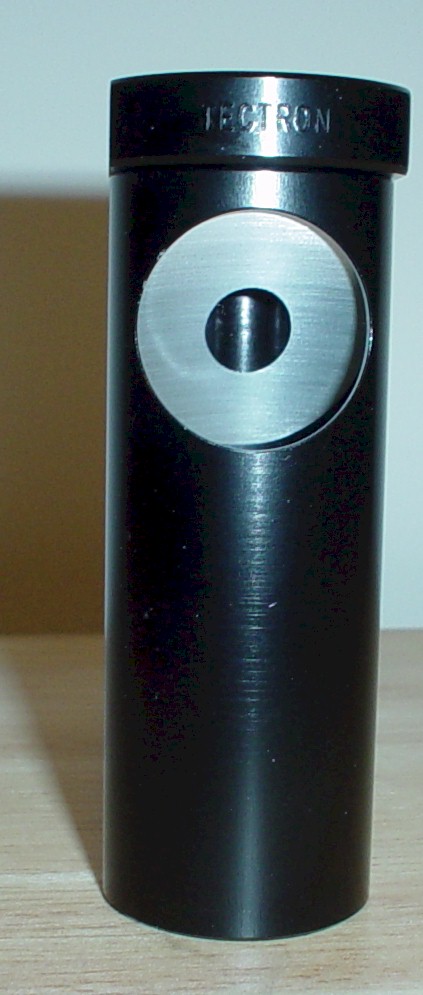
It does not show that well in this picture, but, the shiny, mirrored portion of the Cheshire is tilted at 45 degrees. Note that this shiny mirrored surface faces out of a hole in the side of the Cheshire. The bottom of the Cheshire is open just like the sight tube and the top has a tiny peephole. Note that the mirrored surface has a hole in it -- when you look through the peephole in the top, you look down through this hole and through the bottom of the Cheshire.
It's dark. You have your trusty red LED flashlight and your Cheshire. Scope is set up and you think the primary was knocked out of alignment when you bounced up the road. Insert the Cheshire into the eyepiece opening of the focuser so that the hole in the side of the Cheshire is aimed in the same direction as the scope. Shine your red LED light onto the mirrored surface and look through the peephole.
The red light from the LED flashlight bounces off the 45-degree surface, off the secondary, and onto the primary. By looking through the peephole, you see the primary glowing gently red, reflected in the secondary. In the center of the primary is the center spot and the peephole -- just like during the day when you collimated the scope. If the reflection of the primary is not centered in the secondary, or if the center dot is not centered, loosen the lock screws and adjust the primary. That's it.
The Cheshire allows you to collimate the primary mirror under dark conditions, using your red LED light as the light source.
The star test
Do an Internet search for "star test" and "collimation." You will find several sites that describe using a star to test your collimation. Check out those sites and look at the pictures.
When you have a star focused in the scope, it is a nice pinpoint of light. If your scope is properly collimated, when you run the star out of focus, it dissolves into a circle with several concentric circles. If you keep running it out of focus, it dissolves into a blur.
A properly collimated scope will do this: Star is out of focus. Turn your focusing knob to bring the star into focus then keep turning the knob in the same direction to take the star through focus and out of focus again. As it comes close to focus, it will go from being a blob to having clear concentric circles, to being a pinpoint, to concentric circles, to a blob.
If you don't see those concentric circles, your primary needs a touch up.
Check out these sites for a much better explanation and for some good pictures. NOTE: Be sure to look at the pictures of what a star test looks like under poor viewing conditions. The first time I ran a star test on my scope, the sky appeared clear, but, a snowstorm was moving in and the sky was filled with invisible ice crystals -- when I ran a star test, the stars dissolved into sparkling bands. I was really concerned until I looked at the pictures again.
- http://www.willbell.com/TM/tm5.htm
- http://aberrator.astronomy.net/html/body_star-testing.html
- http://telescopes.skymania.com/2007/09/testing-your-telescope-part-2.html
In conclusion
As I said at the start, I am not a scientist or professional astronomer. I'm just an amateur who did this three times before getting it right. Collimation is necessary; it's easy but you must take care to get it right. You cannot screw up your scope -- they were designed to be collimated. You do not need to collimate every time you use your scope. If objects don't look like they did last week, wait for another view -- it's probably not collimation but sky conditions.
I hope this has been helpful. If you are a collimation expert and I have said anything here that's screwed up, PLEASE send me an e-mail and tell me about it -- I am learning and appreciate your input.
May you have lots of dark, clear skies.
Peace.
| Back to Amateur Astronomy page | |
| Collimation -- Page 1 | Collimation -- Page 2 |